All posts by petero

Ubuntu Slow Boot

There are a few built-in troubleshooting utilities that can help diagnose slow Ubuntu boot issues.

Via the terminal enter the cmd:

systemd-analyze

An output like the following is displayed

Startup finished in 4.901s (firmware) + 4.113s (loader) + 16.613s (kernel) + 13.768s (userspace) = 39.397s

To find out key processes, type:

systemd-analyze blame

A list of applications/services is displayed with the longest consuming (time) at the top. Example:

7.737s NetworkManager-wait-online.service
2.837s dev-mapper-Ubuntu\x2drootvol.device
2.313s lvm2-monitor.service
1.780s systemd-tmpfiles-setup-dev.service
1.708s systemd-sysctl.service
1.120s vmware-workstation-server.service
704ms ModemManager.service
658ms accounts-daemon.service
610ms lightdm.service

To view a graphical version of this data, enter:

systemd-analyze plot > output.html

This creates a HTML file that includes a graphic showing the boot time, along with the acivities, duration etc.

Typing:

systemd-analyze critical-chain

Provides a command-line output ( a simple version) of the processes), like the following:

The time after the unit is active or started is printed after the “@” character.
The time the unit takes to start is printed after the “+” character.

graphical.target @13.765s
└─multi-user.target @13.765s
└─vmware-workstation-server.service @12.644s +1.120s
└─network-online.target @12.046s
└─NetworkManager-wait-online.service @4.308s +7.737s
└─NetworkManager.service @3.731s +575ms
└─dbus.service @3.686s
└─basic.target @3.680s
└─sockets.target @3.680s
└─clamav-daemon.socket @3.678s +777us
└─sysinit.target @3.675s
└─apparmor.service @3.471s +203ms
└─local-fs.target @3.470s
└─run-vmblock\x2dfuse.mount @12.637s
└─local-fs-pre.target @2.726s
└─lvm2-monitor.service @412ms +2.313s
└─lvm2-lvmetad.service @583ms
└─system.slice @398ms
└─-.slice @370ms

Great utilities for identifying bottle necks and slow boot up performance.
August Workshop – Ubuntu Security Hardening

The next HLUG meeting will be a workshop based session covering Ubuntu Security Hardening. A VirtualBox VM will be provided. Please bring along your laptop with VirtualBox installed and 1GB RAM, plus 5GB storage space.

No prior knowledge is required, though some command line experience of Linux is recommended.

Topics includes; why care? CLI, with some challenges. Below is the link to the material that will be used as a reference.

HLUG-Ubuntu Security Hardening

Linux References – Free Resources/Books

Below are some good online references, for learning more about using Linux and for keeping up to date on trends/developments.

Educational

Books

The Linux Command Line – free download: http://sourceforge.net/projects/linuxcommand/files/TLCL/16.07/TLCL-16.07.pdf/download

Many more free books to download: itsfoss.com

OSSEC (Open Source SECurity)

OSSEC  (Open Source SECurity) is an host based intrusion detection system. Its primary function is to monitor Linux systems (files, configurations, rootkits, process monitoring) and alert to any changes. OSSEC is derived from TrendMicro, and the software can be found on enterprise systems monitoring critical hosts such as web servers, database backends etc.

More information can be found at OSSEC

Ubuntu 14.04 Release (Linux OS)

All,

Ubuntu has released version 14.04 LTS (Long Term Support) which means the OS will be supported for at least 5 years. Ubuntu 14.04 is available to download from:

http://releases.ubuntu.com/14.04/

A background on LTS, and the roadmap for other Ubuntu releases can be found here:

https://wiki.ubuntu.com/LTS

Command Line – Copying Files

Copying files via the CLI is easily achieved by using the command ‘cp’:

cp file dest

The limitation with the ‘cp’ command is the lack of status or progress of the file copy. There are a couple of alternative approaches:

Use the ‘watch’ command via a new CLI window or use ‘rsync’.

The ‘watch’ command is a command to watch and refresh the display of the CLI with a specific command and time duration i.e:

watch -n 2 ls -l

Will simply refresh the CLI every 2 seconds with command ls -l. You will be able to see the file size updating every 2 seconds if listing the destination folder. This isn’t a clean solution, requires two windows and separate commands.

Rsync is a command that is vastly superior to the standard cp command. Remote and local hosts are supported and there is checking of files during the copy process. The example:

Rsync — progress file dest

Will show a progress bar of the file copying process.

As a recommendation, once large files have been copied it is always ensuring that the md5 checksum is consistent i.e. the file isnt corrupted. This can be done via the command:

md5sum file

Compare this checksum against the master/original copy. If there is a difference, this means the file is not the same and thus corrupted.

If you are copying large files >4GB onto FAT32 filesystems, then the file will need to be split. One method can achieve this by tar and splitting:

tar -cvj file | split -b 2000m -d – “targetname.tar.bz.”

This will create a tar file, split into 2GB files with a name targetname.tar.bz.xx. If a file is 4.5GB in size then there will be three files targetname.tar.bz.00, targetname.tar.bz.01, targetname.tar.bz.02

Linux Foundation Training Course – FREE

eduX provides online computer based training. One course that caught my eye is module LFS101 – Introduction to Linux, provided by the Linux Foundation. This is a free course, scheduled for later this year.

No previous experience of Linux required, and covers a number of areas, suitable for Linux programmers, system administrators and end users.

Direct link here: https://www.edx.org/course/linuxfoundationx/linuxfoundationx-lfs101x-introduction-1621#.U0PeJum4Brc

I’ve signed up!

Linux Logging

The Linux operating system has a built-in logging facility. The aim of logging is to log system events, in addition to application events and user events.

Why Log Events?

Having a log of events is very important for the system administrator, in order to troubleshoot errors, system faults and to understand activities performed by a user i.e. last login.

View Log Events

Log events are recorded in /var/logs

If you navigate to this folder using the CLI and ‘ls‘ you will see a number of log files.

messages – This is the generic log file for recording startup events, application events

dmesg – This records kernel messages, including boot up messages, hardware information

boot.log – This records the information that you see when Linux boots

cron – Lists cron job events

To view the above log files simply enter ‘more messages‘ to view the messages log.

Special note: dmesg is also a command i.e. typing ‘dmesg | grep -i usb‘ will return a selected list of event messages containing the keyword USB.

To search the messages for ‘usb’ try the following command:

tail -f messages | grep ‘usb’

What Next?

Familiarization with the following commands will help you navigate around the various log files:

less, more, cat, tail – use for viewing files at the CLI

grep – a very powerful utility that can be used for pattern matching/text searching

logger – enables the use to log events via the CLI

Way Forward

The above covers the basic principles of Linux logging. These log files underpin IT security monitoring capabilities and used on an enterprise scale. The next articles will cover the use of ‘syslog’ that can be used to harvest log files for intrusion detection.

Linux Terminal

The terminal under Linux provides a Command Line Interface (CLI) for entering commands to navigate around the file system, perform troubleshooting activities and to execute scripts.

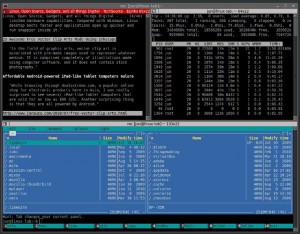
There are many different types of terminals, one of my personal favorites is the ‘Terminator’, which provides advanced layout features and the loading of profiles. If you spend a lot of your time using the CLI, for example I have an IRC application, htop (CPU performance counter), emacs (script editor) and a CLI mp3 player all running in various terminal windows. Using the terminator I can split the main window into different segments, with each segment for its own command/application.

An example is illustrated below:

Terminator
Terminator

Getting started:

For Debian OSs (Ubuntu/Crunchbang etc)

sudo apt-get install terminator

For CentOS/RHEL:

sudo yum install terminator

Once installed, run the application ‘terminator’

Split the screen by right click, select vertical or horizontal. When a new screen is created, follow the same process again.

Once the layout is created, right click then choose preferences. A dialog box is displayed, select Layouts tab, select Add to create the layout, and enter a name. For each terminal option you can specify a custom command i.e. top. Click close to save your changes.

To load your terminator layouts simply enter ‘terminator –layout=mylayoutname’

This can be assigned to an application launcher or desktop shortcut, or an alias via the CLI. You could have multiple layouts, maybe one for development/coding, another for personal use.